


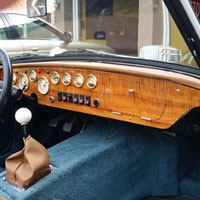
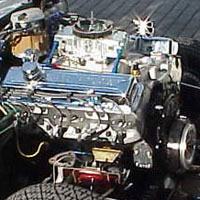

Photo 1.
As I stood looking at the new engine, I mused: 'Is 470 horse power, 500 foot-pounds of
torque powering a 2050 pound car a wise thing?'. You bet your sweet
fanny it is! Just looking at this aluminum headed piece of machinery sets my
blood to pounding and my adrenaline running wild. I am both fearful and
excited -
Lets get it installed!
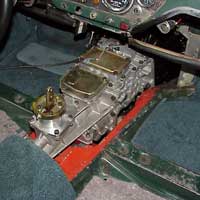
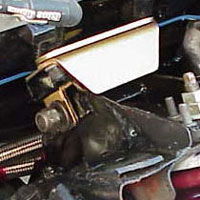
Photo 2.
The transmission has been removed and the 350 engine is about to be connected
to the hoist for removal. The 350 has found a new home in a Jeep CJ soon to
be unleashed upon the off-road trails. Life is
always exciting!
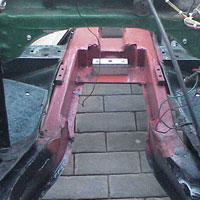
Photo 3 shows the
engine removed - the frame is visible. Although you cannot see the
substructure of the frame that I added when I built the car, you can see the
modification of a portion of the original frame required for the Tremec to fit
and the motor mounts. Also in this photo, the firewall modifications are evident.
Photo 4 shows a
closeup of the frame modifications required for the Tremec 5-spd to fit
into the car. The frame rails were narrowed by 1/2. 1/4 inch thick pieces were
welded back in to provide the rigidity of the original frame - in fact, it is more rigid.
This modification was possible because of the support of the added substructure.
The aluminum transmission mount spacer is visible. It provided for the precise vertical
alignment of the transmission; the transmission mount sits on top of the
aluminum block.
Photo 5 shows
a view of the passenger side motor mount fabrication and the mounted engine. For
motor mount drawings and description, go to the Tech Talk page on
Front Motor Mounts.
In order for the frame to support the weight of the engine, the motor
mounts are placed directly on the Spitfire's suspension pedestals. The second image shows the 383
engine mounted on the driver side motor mount.
Photo 6 shows the
position of the remote oil filter and the oil cooler. The remote
oil filter was a necessity - the frame interferes with the use of an oil filter in the stock
position. While the engine was removed, I plumbed the remote oil filter and cooler with
AN fittings and the stainless steel hosing.
Photo 7 shows the
383 cid engine being lowered and then bolted in place. The Tremec is
installed from inside the car. This makes the installation of the engine
much easier.
Photo 8 shows
the Tremec, driveshaft, hydraulic clutch lines installed. See 'Tremec 3550 Installation' in the
righthand menu for the details of the Tremec's installation.
Photo 9 shows the engine install is
complete. Now, I am going through a list of all systems to be completed.
These systems include the:
- Cooling System
- Install Radiator
- Install Overflow Container
- Install Electric Fans and Wiring
- Install Hoses
- Fill Cooling System with Distilled Water
- Add Water Wetter to Enhance Heat Transfer
- Check for Leaks when Engine is ready to Run
- Fuel System
- Install Electric Fuel Pump in Trunk, next to tank
- Install Fuel Filter
- Install Carburator
- Install Fuel Lines
- Install New Accelerator Cable
- Adjust Accelerator Pedal Travel
- Run Fuel Pump and Check for Leaks
- Remote Oil System
- Install Filter Bypass
- Install Remote Filter Adaptor
- Install Oil Cooler
- Install Oil Hoses
- Spin on the Filter
- Add 6 Quarts of Oil
- Spin Oil Pump with Electric Drill & Shaft - Distributor Removed
- Check for Oil Leaks
- Start Engine and Check Oil Pressure
- Electrical System
- Install Distributor
- Install Alternator Bracket
- Install Alternator
- Install Wiring from Alternator to Amp Meter on Dashboard
- Install Starter & Solenoid
- Connect battery to starter Solenoid
- Connect Solenoid, Bat. Term., to Amp Guage, Alt. Term
- Turn on Ignition and Check Voltage
Photo 10 shows the engine with all systems complete and statically tested. The ignition was set at 12 deg. BTDC to increase the probability of an instant start. The oil pump was primed and lines were tested for leaks; the oil pressure climbed to 60 psi. The Demon carb and my double flared hard lines were tested for leaks. A test of the carb to ensure the release of fuel into the venturies worked fine. Now for the headers.
Photo 11 shows the engine ready for exhaust manifolds. It turns out that the Airflow Research aluminum heads do not allow the use of the stock 'rams horn' exhaust manifolds. The manner in which the heads were cast interferes with the back of the manifold collector. It would take some butchering of the manifolds to make them fit. A spacer to bring the manifolds out from the heads cannot be used since engine clearances are very small.
Custom headers are required. (Oh, darn!!!) It will be costly, but is for the best. The appointment for the headers is a couple of months away. Meanwhile, I will get the bonnet back on the car.
Photo 12 shows where the bonnet had to be altered to allow for the air cleaner and distributor. The rear of the hole in the bonnet had to be extended 1 1/4 inches to accommodate the larger distributor.
Photo 13 shows the bonnet back on with the headlights and parking lights reconnected and tested. Most of the interior has been reinstalled. It feels good to have The Beast almost complete.
It is time for the appointment with Sanderson Headers in South San Francisco for the custom headers.
Photo 14 shows the Beast with a bright, shiny set of custom headers by Boyd Ferry of Sanderson headers. The headers fit perfectly within the confines of the engine in the Spitfire body. Boyd used his skills to fit the headers in this small space. He also replaced the header pipe of the exhaust system to create smoother exhaust gas flow.